Published by Nig on 18 May 2015 at 08:00 pm
TR-8 Creating Patterns
Playing the TR-8 is simplicity itself. Switch it on, press the START/STOP button and away you go. Sooner or later tho’ you’ll want to program your own beats and Roland make this a pretty simple task as well. Basically, the TR-8 is a 16 or 32 step sequencer that can play up to 10 instruments per step. These instruments are arranged into a ‘kit’ containing 11 drums – kick, snare, hi-hat, toms etc.. To create a beat, select an instrument then press the numbered pads at the point in the sequence that you want that instrument to play. Once you have a pattern effects, accents and shuffle can be added, and fills can be added either using the ROLL or SCATTER functions, although these last two are transitory and are not added to the saved pattern.
The basic pattern controls are located on the LHS of the TR-8.
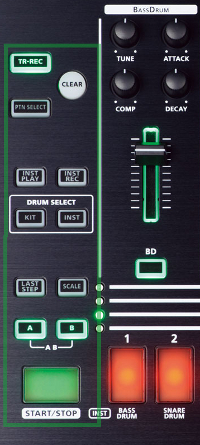 |
TR-REC – TR-8 Step Sequencer modePTN-SELECT – Press this to select from one of the 16 patterns saved in memory
CLEAR – Used for deleting individual drum notes or whole patterns INST PLAY – INST REC – DRUM SELECT (KIT) – Select from one of 16 complete drum kits DRUM SELECT (INST) – Select alternative sounds for individual instruments LAST STEP – Set the last step of a sequencer. Used to set the number of steps to less than 16 SCALE – Set the number of sequencer steps in each beat A/B – Specify either pattern A or B, or both to make a 32-step sequence. |
Some of these controls have other functions when pressed with other controls
Creating a simple pattern
The pattern grid shown below is a basic drum pattern with a kick on each down beat and snare on every other, coupled with an open hi-hat on the second beat after each down beat. Pretty standard stuff really.
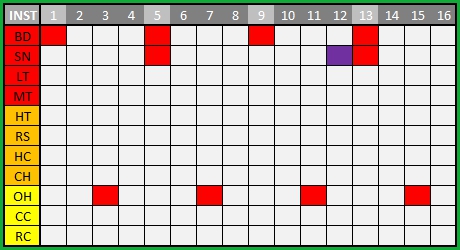 |
To create this using the TR-8’s sequencer, press TR-REC. If there are no instruments currently selected the pads are lit in red, orange, yellow and white in blocks of four. The default SCALE setting is 4 beats to the BAR, which is required for this pattern.
It is entirely possible that there is already a pattern programmed on the TR-8 which can be cleared by pressing PTN-SELECT, then whilst pressing the CLEAR button press the flashing pad. Press the TR-REC button to return to the TR-8 sequencer mode.
Press the BD instrument button and the pad LEDs are lit white to show the down beats of the bar. Press these buttons, and they will turn red. Press START/STOP and the TR-8 will play the sequence on a continual loop so we will hear the common four-to-the-floor kick pattern.
Now press the SD button, and the pad LEDs will again display the white lit down beats. Press pads 5 and 13 so that they go red. The sequence pattern is automatically updated so we now hear both the kick and snare.
Press the OH button and then press pads 3, 7, 11 and 15. They will in turn, go red and the open hat is added to the sequence.
Really couldn’t be simpler. TBH, I don’t even know why I’m writing this! I own an Alesis SR18, Maschine, Spark LE and Volca Beats and none of them allow pattern creation as easily as with the TR-8, tho’ TBH, the Beats does come pretty close.
At present, one thing is missing from the above pattern, and that is the purple step on the snare. This is like a half-hit on the instrument, almost like the flam function available on the 7X7 expansion, but without the additional options available with that set. It’s not configurable but can add some dynamic to the pattern. To add this to the sequence, hold the SD button and press pad 12. It will go purple and the SD will be added to the sequence but with a lower velocity. If you continue to hold the instrument button and press a pad, the TR-8 will switch between the full hit and the lesser one.
Extending the Pattern
The TR-8 has 16 steps for each pattern, but this can be extended to 32 steps as each pattern can have an A and a B part, each of which can be programmed with a different pattern.
Unfortunately, it is not actually possible to copy from Part A to Part B, so Part B has to programmed manually in the same way as Part A. Just press B and enter the required steps. The pattern below is the same as previous, but now has an extra kick on pad 15, an additional snare on pad 16 and the snare flam has been removed (or rather, not entered).
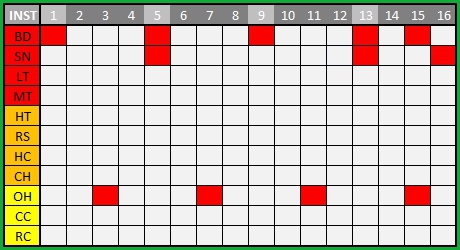 |
Now part A or part B can be played independantly, or, by pressing both A and B together, both can be played one after the other giving us a pattern of 32 steps.
Clea Lewis on 11 Aug 2018 at 12:31 am #
Hey thanks so much for all the information about the TR8. I thinking of purchasing one and your review is really helpful. Want I want to know is if different patterns can be programmed and sewn together to create a song, like having the drums do variations. That is an important feature to me because I do R&B and funk music so sometimes I want the beginning (verse) to do something different on the hook and maybe even a solo and then go back to the verse and hook again. Is that asking too much? Is there a drum machine that can be programmed to do that?
Thanks!
Nig on 11 Aug 2018 at 8:26 pm #
Thanks:-)
There is no song mode on the TR-8 (nor TR-8s for that matter). The most you can do is play multiple patterns consecutively, so you could play patterns 1,2 and 3, for example but not 1,5,6. Even then it will only play a pattern once, before moving to the next in the sequence. If you wanted to do what you want, you would need to change the patterns manually.
I can’t really recommend any alternative as I don’t know what other machines have a song mode, sorry. Of the ones I own, the only one that does have a full song mode is the Alesis SR18 and although this is an excellent drum machine, it is rather old now. Maybe you could look at something like the Korg Electribe?
Boo on 22 Sep 2019 at 6:21 pm #
How do you save patterns to each step?
This should be so simple and basic but I can’t find info anywhere!
Manual is not helpful!
Thanks
Nig on 23 Sep 2019 at 8:02 pm #
I’m not sure what you mean by ‘save patterns to each step’ TBH. There is no explicit save on the TR-8, any changes to patterns are automatically stored in that pattern. The only time it does not is when the pattern is locked. To unlock a pattern, press and hold PTN SELECT and turn the TEMPO Knob.
HTH
Riccardo on 07 Feb 2020 at 11:37 pm #
TR-8 saves automatically to the pattern you are working on, so there isn’t a “Save” or “Write” function like on other synths and drum machines. Then if you want to make sure the pattern is not gonna change, you can LOCK it, but when you lock it for some reason you can’t duplicate the pattern to another slot.
alex st-louis on 10 Sep 2023 at 12:40 am #
first, you clear a pattern in pattern select. to do so, you press PTN select and turn the tempo knob and set it to OFF by turning it. while pressing the PTN select button, press the CLEAR button FIRST!!, keep it pressed, and then select the track you want to delete.
so to change with the recorded patterns, you have to unlock the PTN select button by pressing PTN select and turn the tempo and set the TR8 at OFF instead of lock.
when you program new stuff in an empty PTN track, it will save it automatically.